Introduction
Your Apple ID is the key to accessing Apple services such as iCloud, the App Store, Apple Music, and more. If you’ve forgotten your password or suspect unauthorized access, resetting it is crucial for security. Apple provides multiple ways to reset your Apple ID password, including through the web.
This guide will walk you through the entire process of resetting your Apple ID password via a web browser, covering:
- When You Should Reset Your Apple ID Password
- Prerequisites for Resetting Your Password
- Step-by-Step Instructions for Resetting Your Apple ID Password on the Web
- Troubleshooting Common Issues
- Security Tips After Resetting Your Password
By the end, you’ll have a clear understanding of how to regain access to your Apple ID securely.
FOR MORE : Understanding Apple.com/bill Charges
1. When You Should Reset Your Apple ID Password
You may need to reset your Apple ID password in the following scenarios:
- Forgotten Password: You can’t remember your current password.
- Suspected Security Breach: You believe someone else has accessed your account.
- Account Locked: Multiple failed login attempts have locked your account.
- Two-Factor Authentication Issues: You can’t receive verification codes.
- New Device Setup: You’re signing in on a new device and don’t recall your password.
Resetting your password ensures continued access to Apple services while keeping your account secure.
2. Prerequisites for Resetting Your Apple ID Password on the Web
Before proceeding, ensure you have:
- A trusted device or phone number linked to your Apple ID (for verification).
- Access to your recovery email (if set up).
- A stable internet connection.
- A web browser (Safari, Chrome, Firefox, Edge, etc.).
If you don’t have access to your trusted devices or recovery options, the process may be more complicated, requiring account recovery.
3. Step-by-Step Instructions for Resetting Your Apple ID Password on the Web
Follow these steps to reset your Apple ID password via a web browser:
Step 1: Go to Apple’s Password Reset Page
- Open a web browser and visit:Apple official website
- Alternatively, go to Apple official website and click “Forgot Apple ID or password?”
Step 2: Enter Your Apple ID
- Type in your Apple ID email address (the one associated with your account).
- Click Continue.
Step 3: Choose the Password Reset Method
Apple offers two primary methods to reset your password:
Option A: Reset via Email (If You Have Access to Your Account Email)
- Select “Get an email” if you can access the email linked to your Apple ID.
- Check your inbox for an email from Apple with the subject “How to reset your Apple ID password.”
- Open the email and click “Reset now.”
- You’ll be redirected to a secure page to create a new password.
You May Also Like- Peacock : Start Streaming Today with This Simple Login Guide Visit Peacocktv.com/tv
Option B: Reset via Trusted Phone Number (Two-Factor Authentication Required)
- If you have two-factor authentication enabled, select “Use trusted phone number.”
- Choose to receive a verification code via text message or phone call.
- Enter the 6-digit code sent to your device.
- Click Continue to proceed.
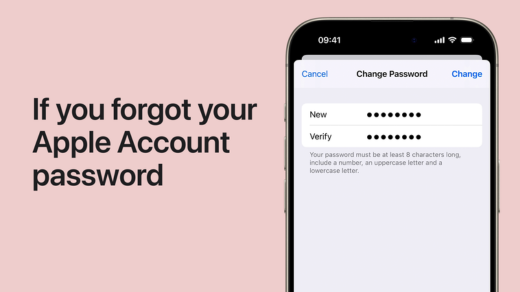
Step 4: Create a New Password
- Enter a strong new password (Apple requires at least 8 characters, including uppercase, lowercase, and numbers).
- Re-enter the password to confirm.
- Click Continue or Reset Password to finalize the change.
Step 5: Sign Back into Your Apple ID
- After resetting, you’ll need to sign in again on all your Apple devices (iPhone, iPad, Mac, etc.).
- Update your password in Settings > [Your Name] > Password & Security on iOS or System Preferences > Apple ID on macOS.
4. Troubleshooting Common Issues
Issue 1: “Apple ID Not Found” Error
- Ensure you’re entering the correct email linked to your Apple ID.
- Check for typos.
- If you’ve forgotten your Apple ID, visit Apple official website to recover it.
Issue 2: Not Receiving the Reset Email
- Check your spam/junk folder.
- Ensure your email provider isn’t blocking Apple’s messages.
- Try resending the email or using a trusted phone number instead.
Issue 3: Verification Code Not Arriving
- Make sure your trusted phone number is correct.
- Ensure your device has a cellular or Wi-Fi connection.
- Request the code again or choose a different verification method.
Issue 4: Account Recovery Required
If you can’t access any trusted devices or recovery options:
- Visit Apple official website.
- Select “Account Recovery” and follow the prompts.
- Apple will verify your identity (may take a few days for security reasons).
5. Security Tips After Resetting Your Apple ID Password
- Enable Two-Factor Authentication (2FA):
- Go to Apple official website > Security > Turn on Two-Factor Authentication.
- Update Passwords on All Devices:
- Sign out and back in on iPhones, iPads, Macs, and Apple TV.
- Use a Password Manager:
- Store your new password securely (e.g., iCloud Keychain, 1Password, LastPass).
- Check for Suspicious Activity:
- Review recent logins at Apple official website.
- Avoid Phishing Scams:
- Only reset your password through official Apple websites (not via email links).
You May Also Like- Peacock : Start Streaming Today with This Simple Login Guide Visit Peacocktv.com tv/samsung
Conclusion
Resetting your Apple ID password via the web is a straightforward process if you have access to your trusted devices or recovery email. By following the steps above, you can regain access to your account quickly and securely.
If you encounter issues, Apple’s support page or contacting Apple Support can help resolve them.
Keeping your Apple ID secure is essential for protecting your personal data, so always use strong passwords and enable two-factor authentication.
By following this guide, you should now be able to reset your Apple ID password with confidence!